
DIY Vintage Paper Wreath
- May 21, 2015
- 4 min read
I often spend WAY too much time staging pieces for photos. My husband laughs as he will enter a room where I am taking a picture of a finished piece and not recognize the room he's just walked into. I have completely rearranged the furniture, changed the bed sheets, changed out the pillows and artwork and heck, I'd move the sun if I could just to make sure I get the right light falling on my pieces.
Good photos sell products. Just like that burger in the fast food commercial - food stylists know that a gleaming drop of juice oozing from that Big Mac will make you want to buy one. Or two. It's not rocket science - it's Marketing 101.
Sometimes I run out of nice, pretty doodads to use in my photos so I'll spend a bit of time making things to help showcase my work. I've often been asked how I made the paper wreath in my staged photo of a lovely wood desk I recently sold on my site. So....here's how!
How to Make
a
DIY Vintage Paper Wreath

Materials:
Vintage Paper ie. an old dictionary, sheet music, atlas
Wood or Cardboard Disc
Twine
Hot Glue
Glue Stick
Ruler
Cutting Mat
Tools:
Drill
1/4" Drill Bit
Scissors
Exacto Knife
Glue Gun
Instructions:
1. Cut a circle from some cardboard or purchase a laser-cut wooden disc from a craft store.

2. Drill a small hole (~1/4") in the disc, approximately 1/2" from edge.

3. Cut a piece of twine and thread it through the hole in the disc. This will be used to hang your wreath. Better to cut a long piece rather than a small one as it can be trimmed - just in case you haven't decided where you'll be hanging this masterpiece!

4. Find some interesting paper - vintage dictionaries or sheet music work great, but anything that has a nice colour scheme or some character are great. I've used an atlas and some old National Geographics too!

5. Using an exacto-knife, carefully cut the pages from the book. Use the spine of the book as a guide to ensure a straight edge.


6. Take a few pages and fold them in half. Using the exacto-knife and ruler (or an old-school yard stick like mine!), cut the pages in half. Make sure to use a cutting mat or board so you don't slice into your table!

Side note: Found this awesome page as I was slicing....you bet your banana this went up on our fridge!

7. Slice a handful of the pages into quarters. These will be used in the centre of your wreath.

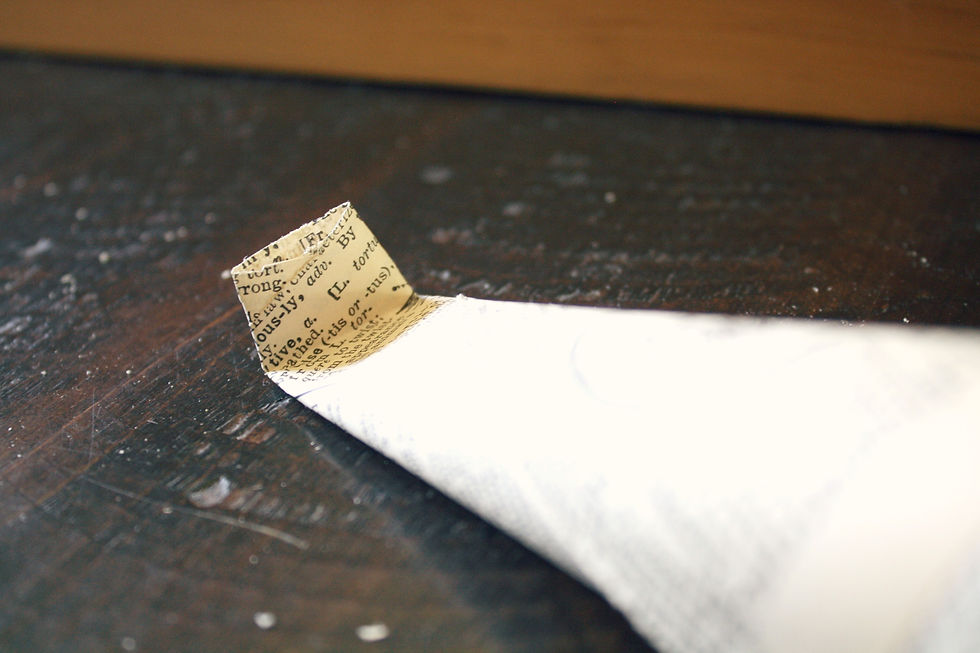
8. Next, glue the top left corner of one of your paper halves. This will hold your cone 'petal' closed. If you're overly particular (like I am!), you may want to think about what corner you want as your petal tip. I try to roll the rough cut edges for the inside of the cone and keep the nice uncut edges for the petal tips.

9. Roll the paper into a cone shape. Press firmly on the edge to adhere the glue.


10. Continue to roll cones in both sizes. How many you need will depend on how large your wood disc is. If you think you've made enough, make more - trust me, you need more than you would think! Best to store them in a box or container until you're ready to assemble the wreath.

11. You're now ready to start assembling your wreath! Take your first large cone and fold the tip slightly. This helps the cones 'stand up' a little rather than laying flat. It will give your wreath a little more depth and structure.
12. Add a good amount of hot glue to the back of the cone. You want to try and put the longest point of the tip of the cone flat on the disc (not sure if that makes sense, but hey, this is why I do picture tutorials!).

13. Starting near the drilled hole, start adhering your cones in a circular pattern. The back row requires a small space between each cone to allow for the next row. Looks a little like Pac-Man with a mohawk at this point, but it will soon start to come together.

14. Continue gluing cones in a circular manner, filling in all the spaces between cones. Each layer should also be a little shorter than the previous layer. You can cut the ends shorter on the cones, or just move them down slightly, letting the tips of the cones underneath to show.

15. Once you start getting to the centre of the wreath (ie. you can no longer see the wood disc), start affixing the smaller cones in the centre. It will start to get tight, so it's easy to use a pencil in the centre of the cones to push the glued end down securely.

There you have it! A completed vintage paper wreath. These look amazing as a focal point on a front door, above a fireplace or in any room for that matter!


Try using paper from other books - like an old atlas, magazines, etc. This one was made from a thrifted travel book on the UK - it had amazing shades of blues and greens that matched our guest bedroom walls perfectly!


Thanks for following along and best of luck making your own DIY Vintage Paper Wreath!
Ciao for now,
Mandy


Comments